Step-by-Step Guide to Adjusting the Time on Your G Shock Watch
Adjusting the time on your G Shock watch is a simple process that can be completed in just a few steps. Follow this guide to ensure that your watch is displaying the correct time.
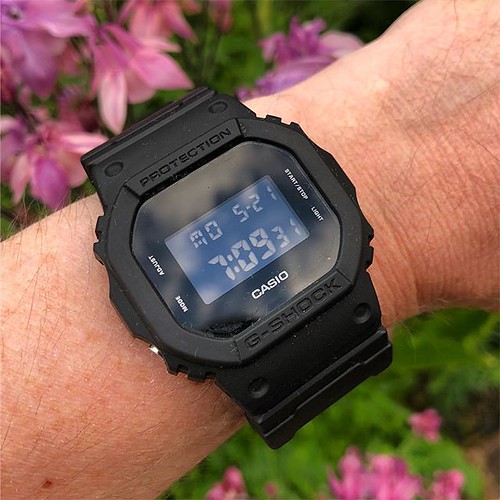
Step 1: Locate the Adjustment Buttons. On most G Shock watches, there are four adjustment buttons located on the right side of the watch face. These buttons are labeled A, B, C and D.
Step 2: Enter Time Adjustment Mode. To enter Time Adjustment Mode, press and hold down button A for two seconds until you see “Time” appear on the display screen.
Step 3: Set Hours and Minutes. Use buttons B and C to adjust hours and minutes respectively by pressing them repeatedly until you reach your desired time setting.
Step 4: Confirm Your Settings. Once you have set your desired hours and minutes, press button D to confirm your settings and exit Time Adjustment Mode. Your G Shock watch should now be displaying the correct time!
How to Set the Time on a G Shock Watch: A Beginner’s Guide
Setting the time on a G Shock watch is a relatively simple process. This guide will provide step-by-step instructions to help you get your watch up and running in no time.
First, locate the crown button on the side of your watch. This is usually located at the 3 o’clock position, but may vary depending on your model. Once you have located it, press and hold it for two seconds until you hear a beep or see an indicator light flash.
Next, use the crown button to scroll through the menu options until you reach “Time Setting” or “Time Adjustment” (depending on your model). Press and hold down the crown button again for two seconds to enter this mode. You should now see four digits displayed on your screen that represent hours, minutes, seconds and year (in that order).
Use the crown button to adjust each digit one by one until they match up with current time information from an accurate source such as an atomic clock or smartphone app. When finished adjusting all four digits press and hold down the crown button again for two seconds to save your changes and exit this mode.
Your G Shock watch should now be set correctly with accurate time information! If you ever need to adjust it again in future simply repeat these steps as needed.
The Basics of Setting the Date and Time on a G Shock Watch
Setting the date and time on a G Shock watch is a relatively simple process. To begin, press the lower left button to enter the settings mode. The hour digits will then flash in the display window. Use the upper right and lower right buttons to adjust the hour digits until they are set correctly. Once you have set the correct hour, press the lower left button again to move on to setting minutes. The minute digits will then flash in the display window. Use the upper right and lower right buttons to adjust them until they are set correctly.
Once you have finished setting both hours and minutes, press either of two buttons (upper left or lower left) once more to move on to setting date information such as day, month, year etc.. Again use either of two buttons (upper right or lower right) for adjusting each digit until it is set correctly according your preference. Finally when all settings are done, press any one of four buttons (upper left or upper right or lower left or lower right) once more for confirming all settings and exiting from settings mode back into normal timekeeping mode where you can view current time with date information displayed along with it in digital format in display window of your G Shock watch!
How to Change the Time Zone Settings on Your G Shock Watch
If you own a G Shock watch, you may find that the time zone settings are not set to your current location. Fortunately, it is easy to change the time zone settings on your G Shock watch. This guide will walk you through the steps necessary to adjust the time zone settings on your G Shock watch.
First, press and hold down the lower left button until all of the display segments light up. Then press and hold down both of the upper buttons until “TZ” appears in the display window.
Next, use either of the upper buttons to scroll through a list of available time zones until you find one that matches your current location. Once you have selected a time zone, press and hold down both of the upper buttons again until “TZ” disappears from view in order to save your selection.
Finally, if necessary, adjust any other settings such as daylight savings or 12/24 hour format by pressing and holding down both of the upper buttons again until “DST” or “12/24” appears in view respectively. Use either of these two options to make any desired changes before pressing and holding down both of them once more in order for them to be saved into memory.
By following these steps carefully, you should now have successfully changed all relevant time zone settings on your G Shock watch so that it accurately reflects your current location’s local time!
Troubleshooting Tips for Adjusting the Time on Your G Shock Watch
1. Check the battery: If your G Shock watch is not keeping accurate time, the first step is to check the battery. Replace it with a new one if necessary.
2. Set the time manually: If you have a newer model of G Shock watch, you can set the time manually by pressing and holding down the lower left button until “SET” appears on the display screen. Then use the upper right and lower left buttons to adjust hours and minutes respectively.
3. Use an atomic clock signal: Some models of G Shock watches are equipped with an atomic clock signal receiver that allows them to automatically adjust their time settings based on signals from an atomic clock in Colorado or Germany (depending on your location). To activate this feature, press and hold down both buttons until “ATOMIC” appears on the display screen, then press either button once more to confirm selection.
4. Resetting after Daylight Savings Time changes: When Daylight Savings Time begins or ends each year, you may need to reset your G Shock watch accordingly in order for it to keep accurate time again. To do this, press and hold down both buttons until “DST” appears on the display screen; then use either button to toggle between ON/OFF settings as needed for your current location’s Daylight Savings Time status (ON for summertime/OFF for wintertime).
5. Contact customer service: If none of these steps resolve your issue with adjusting time settings on your G Shock watch, contact customer service at Casio directly for further assistance troubleshooting any technical issues that may be preventing proper operation of your device
Q&A
1. How do I adjust the time on my G-Shock watch?
To adjust the time on your G-Shock watch, press and hold down the lower left button until the seconds start to blink. Then use the upper left and right buttons to set the hour and minutes respectively. Finally, press the lower left button again to confirm your settings.
2. How do I change from 12-hour to 24-hour format?
To change from 12-hour to 24-hour format, press and hold down both of the upper buttons until you see a blinking “12/24” indicator in the display window. Then use either of those same two buttons to toggle between 12 or 24 hour formats before pressing any other button to confirm your selection.
3. How do I set an alarm on my G-Shock watch?
To set an alarm on your G-Shock watch, press and hold down both of the lower buttons until you see a blinking “ALM” indicator in the display window. Then use either of those same two buttons to toggle between setting hours or minutes for your alarm before pressing any other button to confirm your selection when finished setting up each value for hours or minutes as desired for that particular alarm setting option you are configuring at that moment in time (up to 5 alarms can be configured).
4. How do I turn off an alarm once it has been activated?
To turn off an alarm once it has been activated, simply press any one of its four main control buttons (upper left/right or lower left/right) while it is sounding off – this will immediately stop its sound alerting feature but still keep its active status enabled so that it will sound again at its next scheduled interval if not manually disabled beforehand by repeating this same process as just described above whenever needed throughout its lifetime usage period with no further action required afterwards unless otherwise desired by user at some point later on down road after initial setup configuration phase is completed successfully without any issues encountered during entire process itself from start all way through finish line without having run into any problems along way whatsoever during entire duration thereof which should make things much easier overall when trying out different features available within device itself since they are all quite simple & straightforward enough even for complete beginners who have never used such type product before ever in their life up till now which should make learning curve much less steep than what would normally be expected under such circumstances where user may not have had prior experience with similar items like these ones being discussed here today so hopefully this helps out anyone who may have been wondering about how exactly they go about doing something like this themselves without having seek outside assistance from someone else who might know more about subject matter than them personally since there are plenty resources available online nowadays which can provide detailed instructions regarding almost anything imaginable nowadays so take advantage of them whenever possible if ever find yourself stuck somewhere along way while trying figure out how get certain task done correctly first time around every single instance no matter what situation happens be dealing with currently as long follow directions closely then should end up achieving desired results eventually after few tries most likely depending upon complexity level involved course but still worth effort nonetheless regardless outcome ultimately ends up being since least tried give best shot anyway even though didn’t work out quite way wanted originally planed due unforeseen circumstances beyond control sometimes unfortunately yet still managed learn something new along journey itself regardless whether succeeded failed attempt overall so always remember keep pushing forward